Although serigraphy is most associated with Postmodern and contemporary art it is actually a very old technique. It has been in use for centuries and over time has become increasingly diverse. Screen printing first appeared in ancient Egypt and then in Song Dynasty China and ancient Japan (960-1279 AD) and was introduced to Western Europe in the late 18th century. In Western Civilisation, it was primarily used to print expensive wall papers in shops that were very secretive about their knowledge and techniques. Early in the 1910's several printers began experimenting with photo-reactive chemicals and developed photo-sensitised emulsions for creating photo-reactive stencils. Artists eventually adopted screen printing as a convenient medium for making multiples. Today we primarily use similar photosensitive chemicals and a polyester mesh instead of silk.
In the 1960's first Eduardo Paolozzi and then Andy Warhol began to use screen printing as a fine art technique. Many artists have used the medium to reproduce imagery appropriated from popular culture and challenge ideas about what could be art. Contemporary artists like Ryan McGinness follow in their footsteps. More recently, artists have begun using computer programs like Adobe's Photoshop and Illustrator to create stencils and manipulate subject matter.
Additional contemporary screen printers include Alexander Johnson,
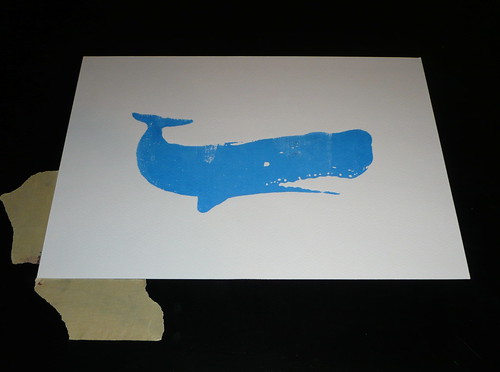
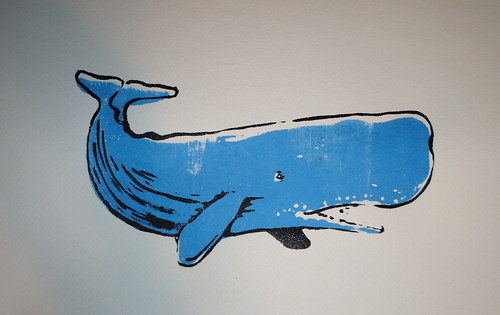
Making a multicolored screen print is kind of like making a jigsaw puzzle. The artist separates the image into colors which are printed in separate layers, one color per layer.
Dallas Hudgens' page on screen printing provides another good set of instructions for this process.
Preliminary Assignment: Learning to work with the materials.
For the first session on this assignment we are going to print an edition of five using wax paper stencils.
You will need:
- A Sharpie
- An Ex-acto knife
- Masking tape
Bring to class in your sketchbook:
You will need:
- A Sharpie
- An Ex-acto knife
- Masking tape
Bring to class in your sketchbook:
- An image in three colors, the white of the paper and two others.
- A description of this process in your own words.
- A set of printing steps.
Session 2: A practice run on newsprint with the wax paper method.
Before class, decide on an image that you would like to print. Figure out how your image can be broken down into layers. Trouble shoot. Figure out what this process will and will not let you do
You are practicing and developing a strategy for making your print. Figure out what colors you'll need. Are those colors available in the shop? Do you need to mix them?
Primary Assignment:
Edition of ten containing a minimum of four colors. Your colors must include the white of the paper and a key color, black is usually a good choice. Your other colors may be any color that you can find or mix in the shop.
You will need:
- Clear mylar or acetate. Tracing paper will work, but not as well.
- A drawn black silhouette for each layer of your print photocopied or printed onto transparencies. Old fashioned photocopiers that use powdered toner work best. If you can only find ink based printers then you'll need to double them up.
- Masking tape, a little duct tape and a little bit of transparent tape.
- One sealable tupperware type container for each color you plan to mix.
- You may need one cheap little paint brush.
Edition of ten containing a minimum of four colors. Your colors must include the white of the paper and a key color, black is usually a good choice. Your other colors may be any color that you can find or mix in the shop.
Your prints must have 2" top and side margins and a 2.5" bottom margin.
You will receive two sheets of paper from which to make your prints.
You will share a screen with a partner. You may choose to work together or individually. If you choose to work together, you must still have two separate images.
PROCESS STEPS:
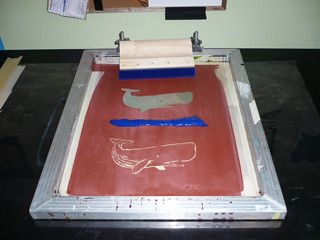
You will have a stretched vinyl mesh or screen as your matrix for this assignment rather than a plate. The woven mesh supports a photo emulsion stencil. The stencil defines open and blocked out areas of screen. A squeegee is used to force ink through the open screen and onto the substrate.
1: Coating your screen: Once coated your screen is light sensitive! Keep it in the dark room.
- Pick a screen from those designated for our class. Your screen should have a good covering of duct tape over all of the wood and a couple of inches of the screen around the edges.
- Write your name, your partner's name, and the semester on it with a permanent marker.
- Your screen needs to be as clean as possible before you begin. Hold it up to the light and make sure there are no little flecks of dried paint or emulsion in it.
- Coat your screen with photo emulsion in the dark room. Fill an emulsion tray and scrape it upward across your screen making a thin, smooth, even coating on both sides, trying to avoid drips and runs. The emulsion is in an extremely messy looking plastic bucket in the small refrigerator in the dark room.
- Scrape as much of the excess emulsion back into the bucket as possible. It is expensive and we are not getting any more this semester, be very careful with it.
- The emulsion must be kept tightly sealed and in the refrigerator.
- Place your screen in the darkroom rack to dry overnight.
- Clean up the giant mess you just made.
2: Preparing your image:
- There is no need to reverse your image with screen printing.
- Create a three color image.
- Separate your image into layers corresponding to colors. You can trace your layers on separate sheets of paper and have those photocopied onto transparencies. The ink in your transparencies must be black. You may want to go over the back side of your transparencies with India Ink or double them up to be on the safe side.
If you have the skills, you may use imaging software to create your image, separate your layers, and print the separate layers on transparencies. Make sure you remove the color from each of your layers and make them as black. This method has the added benefit that you can easily add precise registration marks when you create the image.
3: Shooting your screen:
- Make sure the emulsion is dry in your screen before your begin. You and your partner must do this at the same time.
- In the dark rooom, with transparent tape, tape your layer drawings face down onto the front of your screen. The ink of the drawing should be turned toward the emulsion on the screen.
- Quickly take your screen from the darkroom to the exposure room. Do not turn on the light, remember, your screen is light sensitive. Leave the door cracked for a little light if you need to.
- Lay your screen front side down on the glass on the light table. Close the table and lock it down.
- Turn on the light.
- Exposure will take 7 minutes.
- When the time us up take your exposed screen to the power washer or sink and wash out your stencil. Be careful not to blast the emulsion from the wrong areas. Start by letting the water do the work and hand massage the emulsion out under the flowing water.
- If necessary, you may repair any areas that did not properly set with screen filler and a small brush which should be in the cabinet.
4: Registration:
These registration instructions come from Michelle SaintOnge's website PrintCutSew.
For this assignment you will use an arrangement of tracing paper and masking tape to register your image.
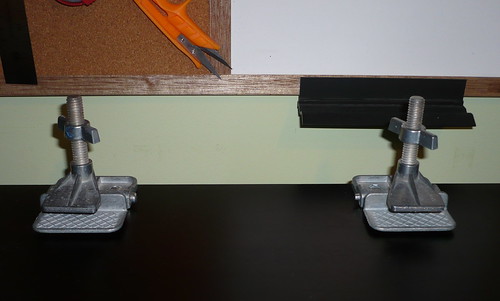
Lay a large piece of tracing paper, clear mylar or clear acetate on your print surface and tape it securely into place with masking tape on one side only so it can be flipped out of the way.
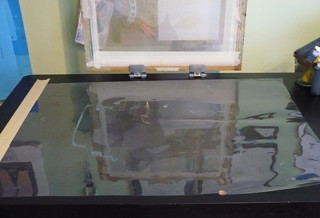
With your screen lowered onto the acetate print one pass of your image. This image on the acetate now lets you know where your screen will print each time.
Add the correct border to your drawing, maybe tape it onto a sheet of newsprint. Slide your drawing underneath the acetate until the image matches up with the image on the acetate. Then flip the acetate out of the way.
Take two pieces of masking tape and line them up with the bottom and the side of your drawing - these are your registration tabs. When you remove the drawing to print you will line up edges with your tape and that’s how your image prints consistently in the same place with each piece of paper.
Paper Registration Step 6
If your print has multiple colours then you’ll follow the same technique to print the second colour and so on. When your first colour is printed, remove the paper print and flip the acetate or tracing paper back onto the print surface.
Wash off the first colour and place the second screen into the hinge clamps and print the second colour. Now you’ll line up one of your printed pieces underneath the acetate and move it until the colours line up. Then move your registration tabs so they line up with the new position for the paper.
5: Printing:
- Use waterproof tape and newsprint to cover any stencil areas you are not using.
- Mix enough ink to make your edition.
- Lay a thick line of ink to side of the stencil for the layer you are printing.
- With a squeegee, flood the screen by dragging the ink across in one smooth quick motion.
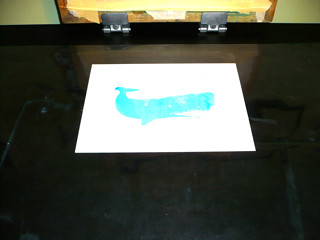
- Lay a newsprint proof sheet down, drop the screen onto it.
- Pull the ink across pushing the ink through and onto the newsprint.
- Make sure everything is where it should be and make any necessary adjustments.
- Pull three to five proofs and then move on to your good paper.
You will be using acrylic inks which may dry in as little as an hour. Which means you'll be able to move through this assignment pretty quickly.
On the other hand, these inks may also begin to dry in your screen as you print. If your ink starts to dry up and fill in your screen, quickly take it to the sink and rinse it out. Massage out any places that have filled in.
The ink may also build up too thickly in your screen and start to spread beyond the edges of the stencil. If this happens you'll need to scrape off your ink, wash, and dry the screen.
6: Printing Successive Layers:
- Securely cover your ink and put it on the shelf for future use.
- If you have more layers to print, put your screen in the rack and your template in a safe place.
- If you are done printing clean the stencil out of your screen.
8: Reclaiming Your Screen:
- Take your screen into the reclaiming room and spray it with the reclaiming solution. Let it soak in for about five minutes.
- Scrub the solution into the emulsion with a cleaning brush.
- Blast out the emulsion with the pressure washer. Be careful not to blast a hole in the screen.
- You may need to repeat the process once or twice.
- Show me your clean screen.
This assignment will be scored based on three criteria. These criteria will be weighted and assessed as follows:
1. Concept: 5 Points.
Interpretation and application of your own ideas to the assignment using expressive, emotive, and aesthetic elements. Ask yourself “What am I trying to say with this image?” “How can I visually convey my idea?”
2. Participation: 5 Points.
Attendance, involvement with your group, putting in time in the shop, proper shop etiquette, participation in discussions and critiques.
3. Process: 10 Points.
Display an understanding of the process, making an edition of consistent prints, registration, and general neatness of the work.
- The complete assignment is an edition of prints and an artist's statement. Incomplete assignments will continue to loose points for lateness until everything is turned in.
Additionally, the following will cost you a letter grade:
5: Printing:
- Use waterproof tape and newsprint to cover any stencil areas you are not using.
- Mix enough ink to make your edition.
- Lay a thick line of ink to side of the stencil for the layer you are printing.
- With a squeegee, flood the screen by dragging the ink across in one smooth quick motion.
- Lay a newsprint proof sheet down, drop the screen onto it.
- Pull the ink across pushing the ink through and onto the newsprint.
- Make sure everything is where it should be and make any necessary adjustments.
- Pull three to five proofs and then move on to your good paper.
You will be using acrylic inks which may dry in as little as an hour. Which means you'll be able to move through this assignment pretty quickly.
On the other hand, these inks may also begin to dry in your screen as you print. If your ink starts to dry up and fill in your screen, quickly take it to the sink and rinse it out. Massage out any places that have filled in.
The ink may also build up too thickly in your screen and start to spread beyond the edges of the stencil. If this happens you'll need to scrape off your ink, wash, and dry the screen.
6: Printing Successive Layers:
- Make sure your screen and print are completely dry before adding another layer. Your print should be dry in a couple hours.
- Follow the registration strategy as above looking through the screen to register your layer by eye and then tape the template in place.
- Use your newsprint proofs to dial in your registration before moving on to your good paper.
7: Clean Up:
- Carefully wash out your screen before any ink dries in the mesh. 7: Clean Up:
- Securely cover your ink and put it on the shelf for future use.
- If you have more layers to print, put your screen in the rack and your template in a safe place.
- If you are done printing clean the stencil out of your screen.
8: Reclaiming Your Screen:
- Take your screen into the reclaiming room and spray it with the reclaiming solution. Let it soak in for about five minutes.
- Scrub the solution into the emulsion with a cleaning brush.
- Blast out the emulsion with the pressure washer. Be careful not to blast a hole in the screen.
- You may need to repeat the process once or twice.
- Show me your clean screen.
This assignment will be scored based on three criteria. These criteria will be weighted and assessed as follows:
1. Concept: 5 Points.
Interpretation and application of your own ideas to the assignment using expressive, emotive, and aesthetic elements. Ask yourself “What am I trying to say with this image?” “How can I visually convey my idea?”
2. Participation: 5 Points.
Attendance, involvement with your group, putting in time in the shop, proper shop etiquette, participation in discussions and critiques.
3. Process: 10 Points.
Display an understanding of the process, making an edition of consistent prints, registration, and general neatness of the work.
- The complete assignment is an edition of prints and an artist's statement. Incomplete assignments will continue to loose points for lateness until everything is turned in.
Additionally, the following will cost you a letter grade:
- Failure to clean out your screen when you've finished with it.
- Fingerprints or smudges on your prints.
- Failure to properly identify your prints.
- Failure to turn in an artist's statement with your prints.
- Prints hung after critique begins will be considered one day late.
Additionally, additionally:
For some reason we tend to have a lot of theft associated with this project. Students steal each other's screens quite a bit. Steal all the screens you want, but if you get caught stealing someone else's screen you will receive an F on the entire assignment. Not just a failing grade, A BIG FAT ZERO.