Metal engraving had a long history before it was co-opted for use as a printmaking technique. The very earliest prints may have evolved from the needs of craftsmen like armor makers, goldsmiths, and silversmiths. They would have been interested in a way to record designs for future use and to display for their clientele. Paul Revere, in addition to his activities as a revolutionary, was a silversmith, made prints, and printed the first paper currency of the United States.
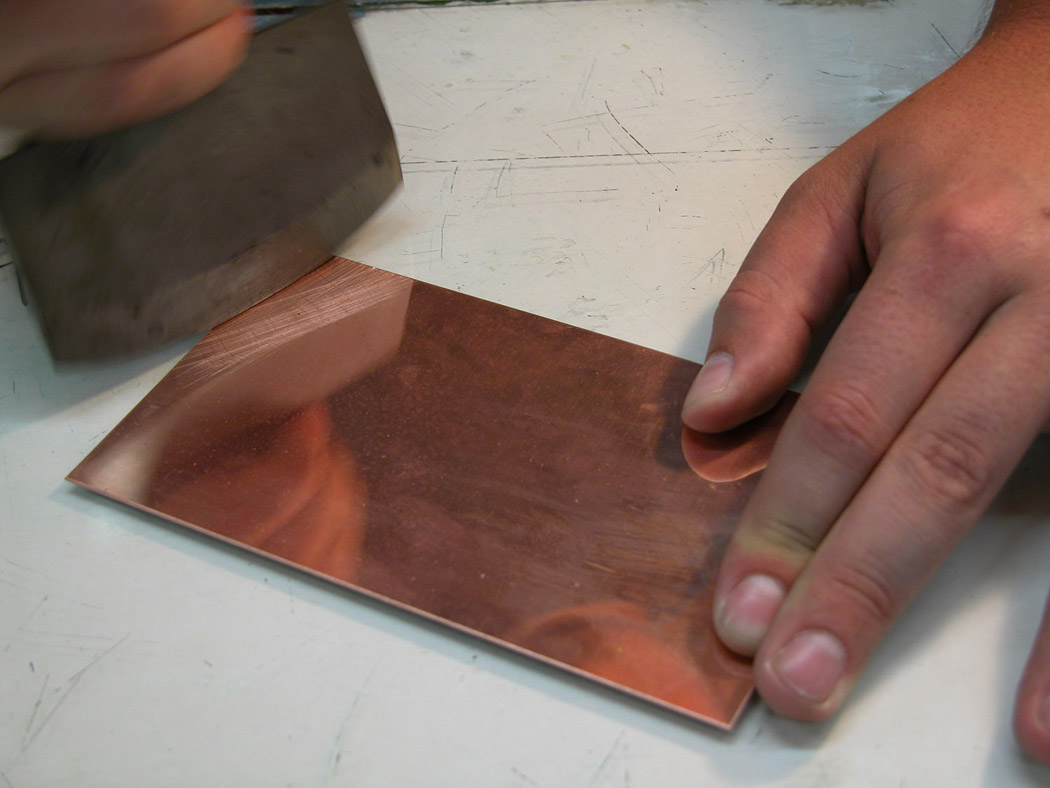
Intaglio is an Italian word that translates as incising. At least in the English speaking world, intaglio is used to describe all of the processes described below and several more. An intaglio plate is made of copper, zinc or steel in the case of plates to be used for especially large editions. The image is made of incisions (grooves) which can be of varying depths. The printmaker smears the ink onto the plate with a card (the ink is not rolled on). This fills the incisions with ink and the printmaker wipes the plate surface until it looks almost clean, first with a cloth followed by hand wiping. The printmaker then covers the plate with a moist sheet of paper, and runs it through the press. The press forces the paper into the depressions of the plate and pulls the ink out to make the image.
In English, the words engraving, drypoint, and etching are often used to mean intaglio, they are not quite the same. Engraving and drypoint are the same, using the sharp point of a metal tool called a scribe to scratch or cut directly into a plate. The scratching doesn’t remove the metal but throws it up as a burr and makes a ridge similar to the ridge of earth thrown up when a plow goes through a field. An engraved line looks wiry and has ends that taper.
Etching specifically means that acid is used to etch, or bite, the plate. The unique beauty of this type of printing lies in its allowing the plate to be inked to varying thicknesses creating velvety chiaroscuro. In making an etching, the plate is first coated with an acid-resistant material called a ground. Instead of working into the plate itself, the printmaker works the ground, removing it in some places and not it others. The acid bites the plate where the ground has been removed. Grounds for line drawing are usually made of waxes and the names of the various types of etchings come from the types of grounds used.
In the video below you can see the making of a hard ground etching highly dramatized in a clip from the movie Goya's Ghosts.
In the video below you can see the making of a hard ground etching highly dramatized in a clip from the movie Goya's Ghosts.
Hard ground etching is primarily used to make lines. The printmaker coats the plate with a hard wax, hard ground, and then draws through the wax to expose parts of the plate. Hard ground lines are usually thin, wiry, and blunt at the ends. If you click on the caption below Colm MacAthlaoich's image he's provided some nice close-ups where you can see those characteristics. The ground itself, the wax, is also used to make a resist. It is simply applied to the plate to protect parts of it from being bitten by the acid. This is useful in protecting areas that have already been worked to masterful perfection via some other technique.
Soft ground etching employs a softer wax and there are more possibilities for visual variety. Soft ground lines look more like pencil or crayon lines and textures are also possible. To give you some ideas, you can coat a plate with soft ground, lay a piece of paper over it and make marks by drawing on the paper. When the paper is lifted off, it pulls off the wax where the pencil pressed the paper into the ground. Or, textured fabrics, low relief objects, etc can be laid over the ground and run through the press to make an impression in the ground. Soft ground can also be used to make a resist.
The image below is a soft ground etching from the Wretched Etcher made by pressing a piece of lace into soft ground. Click the caption to jump to the website and a brief description of how it was made.
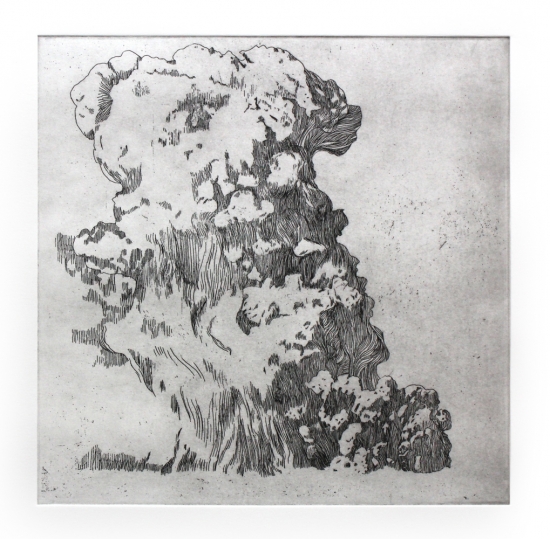 |
| Colm MacAthlaoich, Monumental Activity, Hard ground Etching |
Soft ground etching employs a softer wax and there are more possibilities for visual variety. Soft ground lines look more like pencil or crayon lines and textures are also possible. To give you some ideas, you can coat a plate with soft ground, lay a piece of paper over it and make marks by drawing on the paper. When the paper is lifted off, it pulls off the wax where the pencil pressed the paper into the ground. Or, textured fabrics, low relief objects, etc can be laid over the ground and run through the press to make an impression in the ground. Soft ground can also be used to make a resist.
The image below is a soft ground etching from the Wretched Etcher made by pressing a piece of lace into soft ground. Click the caption to jump to the website and a brief description of how it was made.
 |
| Wretched Etcher, Soft Ground Etching |
Aquatint is kind of a big deal if you want to have values in your prints. Aquatint a ground but it is not a solid coating on the plate. Instead the printmaker dusts the plate with fine particles of pine rosin. For a perfectly even tone, the printmaker creates a rosin dust storm in an aquatint box so that the particles will fall onto the plate evenly. The idea is to have an even distribution of rosin particles that are not touching each other, like a lot of tiny polka dots. After the rosin particles are on the plate, they must be heated to make them melt and adhere to the plate. The plate is then placed in the acid. The acid bites around each tiny grain of rosin creating a tooth in the plate to hold ink. Up to a point, the deeper the bite the more ink is held in the plate and the darker the tones will be in the print.
The print below is an aquatint. The plate was layered one time with rosin and placed in the acid bath multiple times. The artist put the plate in the acid, took it out, covered a some areas with soft ground, put it back in the acid, took it out, covered more areas with soft ground and so on through several steps. The areas that remained uncovered the longest were bitten deeper and printed darkest. Clicking the caption will take you to an interview with the artist in which he talks about his work and how printmaking fits into his studio practice.
Soap ground aquatint, also called white ground aquatint, involves a mixture that includes liquid soap painted onto the plate. The printmaker puts a layer of aquatint on the plate either before or after applying the soap. Again, the idea is that the soap ground should protect the plate. However, the soap isn't completely acid resistant. So, while the plate is in the acid the soap slowly breaks down and comes off of the plate resulting in irregular tones. The areas coated in soap have a variety of lighter values. The areas not coated in soap ground, but aquatinted, are darker.
The image below was made by Pat Steir using soap ground and printed by professional printer Brian Sure at Crown Point Press in exactly this way. Clicking on the caption will take you to Crown Point's webpage which is a great etching resource.
Mezzotint is another way to create tones on a plate. These are made by applying an even black tone to the entire plate with a mezzotint rocker. The rocker is a curved tool with little teeth which is worked over the plate in a rocking motion to create a rough texture that will hold ink. In my opinion this is the best way to make deep velvety blacks in your prints. You can work back into mezzotinted areas it to lighten them back up by smoothing them back out as in the print below by James Groleau.
Sandpaper can be used to create tones as well, although not as neatly. The coarser the grit, the darker the tone.
The print below is an aquatint. The plate was layered one time with rosin and placed in the acid bath multiple times. The artist put the plate in the acid, took it out, covered a some areas with soft ground, put it back in the acid, took it out, covered more areas with soft ground and so on through several steps. The areas that remained uncovered the longest were bitten deeper and printed darkest. Clicking the caption will take you to an interview with the artist in which he talks about his work and how printmaking fits into his studio practice.
 |
| David Schnell - Sandbank -Aquatint |
Soap ground aquatint, also called white ground aquatint, involves a mixture that includes liquid soap painted onto the plate. The printmaker puts a layer of aquatint on the plate either before or after applying the soap. Again, the idea is that the soap ground should protect the plate. However, the soap isn't completely acid resistant. So, while the plate is in the acid the soap slowly breaks down and comes off of the plate resulting in irregular tones. The areas coated in soap have a variety of lighter values. The areas not coated in soap ground, but aquatinted, are darker.
The image below was made by Pat Steir using soap ground and printed by professional printer Brian Sure at Crown Point Press in exactly this way. Clicking on the caption will take you to Crown Point's webpage which is a great etching resource.
 |
| Pat Steir - Big Fall, Black & White - Soap Ground Aquatint |
Mezzotint is another way to create tones on a plate. These are made by applying an even black tone to the entire plate with a mezzotint rocker. The rocker is a curved tool with little teeth which is worked over the plate in a rocking motion to create a rough texture that will hold ink. In my opinion this is the best way to make deep velvety blacks in your prints. You can work back into mezzotinted areas it to lighten them back up by smoothing them back out as in the print below by James Groleau.
 |
| James Groleau - Arbil - Mezzotint |
Sandpaper can be used to create tones as well, although not as neatly. The coarser the grit, the darker the tone.
A lot of intaglio happens at Crown Point Press and Paulson Bott Press. Crown Point's sister website Magical Secrets and Paulson Bott's blog both have videos of artists working, talking about their work and on techniques. Magnolia Editions, Malaspina Printmakers, Universal Limited Art Editions, Washington Printmakers and Wingate Studio are also good places to look for influences and examples of intaglios.
There are good supplemental instructions at Wretched Etcher.
Intaglio artists:
There are good supplemental instructions at Wretched Etcher.